<<Part One>> <<Part Three>>
Working with Strong Names:
Strong-name signing is always a good idea for most of the applications, especially for the applications that are deployed over a network and not fully controlled by the deployer. The anti-spoofing and anti-tampering benefits are quite valuable. Before moving into the details it is better to know the challenges involved with the strong naming. There are few limitations or challenges with the strong naming like below:- All assemblies referenced by a strong-named assembly must also be strong-named. You cannot strong name an assembly if it referencing an assembly that is not a strong named.
- A strong-named component cannot be serviced or upgraded just by copying a new version over the old one. Suppose, your application was built against version x.x.x.x (like 1.0.0.0) of a strong named assembly and for some reasons you made few changes and bumped the version to x.x.x.y (like 1.0.0.1) then the existing application will not find your updated assembly. As per the current versioning policy, an assembly will always attempt to load the exact version of the assembly it was built against.
You can overcome this issue either by rebuilding the application against the new assembly or you must update the application's .config file to instruct the runtime to load the new version instead of the old one or by not changing the version number. If the assembly is installed in the GAC, you can use publisher policy to redirect loads for previous version to new version.
What can be strong-named?
You can strong-name .NET Framework assemblies and XML manifests. These include:Application Assemblies (.exe)
Application Manifests (.exe.manifest)
Deployment Manifests (.application)
Shared Component Assemblies (.dll)
How to: Sign an Assembly with a Strong Name:-
The .NET Framework SDK provides several ways to sign an assembly with a strong name, For Example:
Using command line tools:You can create a random key pair with sn.exe and pass that key pair to the compiler when compiling your code.
Step 1: sn –k <keyfile name>
Step 2: <compiler> /keyfile:<kefile name> <application name>
Example:
Step 1: sn –k myKey.snk
Step2: csc /keyfile:myKey.snk myApp.cs
The above commands produce a strong-name signed application named myApp.exe using myKey.snk key file. In which sn –k myKey.snk produces a random key file with the name of myKey.snk and csc /keyfile:myKey.snk myApp.cs signs the application named myApp.
Using the Assembly Linker (Al.exe) provided by the .NET Framework SDK:
To create and sign an assembly with a strong name using the Assembly Linker, first generate a key pair using sn.exe and provide that key file to assembly linker.
Step 1: sn –k <keyfile name>
Step 2: al /out:<assembly name> <module name> /keyfile:<keyfile name>
In the above command, assembly name is the name of the assembly to sign with a strong name, module name is the name of the code module used to create the assembly, and keyfile name is the name of the container or file that contains the key pair.
Example:
Step 1: sn –k myKey.snk
Step 2: al /out:MyApp.dll MyModule.netmodule /keyfile:myKey.snk
Using assembly attributes to insert the strong name information in your code:
You can use either the AssemblyKeyFileAttribute or the AssemblyKeyNameAttribute, depending on where the key file to be used is located. In a code module, add the AssemblyKeyFileAttribute or the AssemblyKeyNameAttribute, specifying the name of the key file or key container to use when signing the assembly with a strong name.
Step 1: sn –k <keyfile name>
Step 2: [assembly:AssemblyKeyFileAttribute(@"<keyfile name>")]
Example:
Step 1: sn –k myKey.snk
Step 2: [assembly:AssemblyKeyFileAttribute(@"myKey.snk")]
Using Visual Studio for signing the assemblies:
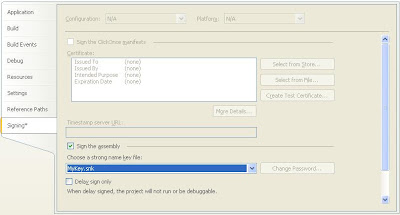
You can sign your assembly using the options in the Signing page of the Project Designer using a new/existing key file.
Step 1: With the project node selected in Solution Explorer, from the Project menu, click Properties (or right-click the project node in Solution Explorer, and click Properties).
Step 2: In the Project Designer, click the Signing tab.
Step 4: Specify a new key file. In the Choose a strong name key file drop-down list, select <New...>. The Create Strong Name Key Dialog Box appears. In the Create Strong Name Key dialog box, enter a name and password for the new key file, and then click OK.
Storing the private key in a file next to your code is not a secure way to protect your private key. You can password-protect the key file. When you create a new strong name key for your project, just select "Protect my key file with a password" option (see below figure) and enter a password for your key file. Visual Studio adds a personal certificate, a PFX file, to your project. This file includes your encrypted private key, protected by the password you selected. Note that new key files are always created in the .pfx format.
Step 1: With the project node selected in Solution Explorer, from the Project menu, click Properties (or right-click the project node in Solution Explorer, and click Properties).
Step 2: In the Project Designer, click the Signing tab.
Step 3: Select the Sign the assembly check box.
Step 4: Specify an existing key file. In the Choose a strong name key file drop-down list, select <Browse...>. In the Select File dialog box, navigate to the key file or enter its path in the File name box; then click Open to select it.
Strong Naming and Delay Signing Of Assemblies: Part One
Strong Naming and Delay Signing Of Assemblies: Part Three


